Shims scored @ the Ducati dealer!
Tuesday, April 24, 2012

Monday, April 23, 2012
Down to 2 valves out of spec - they are both on the same bucket.
I called the Ducati dealership today, but the parts guys were closed. Apparently it is tradition for motorcycle shops to be closed on Mondays. I never knew that.
I'm hoping they will trade me some shims tomorrow, but I'm not banking on it. I need 2 3.5mm shims which are openers on the Ducati. I could use a couple more probably - I'll take 4 shims with me and sacrifice some synthetic oil to the Italian automotive gods tonight.
Sunday, April 22, 2012
The seller of the engine refunded me more than enough to purchase a gasket set. My old engine had 3 big valves unbent, luckily only 3 valves bent on the new engine.
I swapped the valves over, replaced the stem seals, and have been fighting with valve shims.
I've got 15 of the 18 valves properly clearanced. Hopefully I'll be finished tomorrow evening and the engine can go in this weekend.
I swapped the valves over, replaced the stem seals, and have been fighting with valve shims.
I've got 15 of the 18 valves properly clearanced. Hopefully I'll be finished tomorrow evening and the engine can go in this weekend.
Monday, February 13, 2012
Crap~!
This weekend I got the 2.5l engine out of the Biturbo. I went to change the timing belt on the new engine and noticed one of the cams was off by 4 teeth. I purchased a leak down tester which confirmed my fears. Massive leakage from the intake valves on the passenger side cam.
Lame.
Disassembly to happen one evening this week.
Friday, February 3, 2012
Shipping today!

Engine ships today, $197 for freight from VA to San Antonio, including insurance. Megasquirt also ships today, from someplace in Mississippi.
Sunday, January 29, 2012
Parts!
Purchasing this week:
1989 2.8l Masrati 430 engine.
1989 2.8l Masrati 430 engine.
- 2.8l vs the 2.5 that came in my car
- bigger intake valves (car has 2 intake valves, on the 2.8l they are the same size)
- Fuel Injection!
- Intercoolers!
- Will run fuel only
- Will use ignition that came with my car
- Will be used for Boost control
Monday, March 21, 2011
oh noes!
Somehow the a/c belt (a/c works friggen awesome) wound up behind the timing cover. I noticed an odd sound during cranking, saw the a/c partially behind the timing cover.
I then removed the timing cover, timing belt, and then re-timed everything and installed new belt.
Now, I have -0- compression on #2 and #3.
Sad Matthew.
Sunday, March 6, 2011
Updates
I got the K&N air filters on, they are currently pulling hot air from the factory airbox location (against the false firewall at the rear of the engine compartment) Once I make it back to Pick-n-Pull I will relocate the battery to the trunk, then the filters can go behind the headlamps.
With the help of Mikey, I rebuilt the carb. While doing so, I also completely removed the choke assembly.
Friday, February 25, 2011
Getting there
I've put about 500 miles on her since Tuesday morning. I went up to Ft Hood on Wednesday for work. There was a horrible stumble around atmospheric pressure. High idle and boost were both OK.
With the assistance of Adam I put in new plugs @ San Marcos, but that did not resolve the issue. It helped some, but did not resolve. Then Jonny gave me a MSD Blaster 2 and that seemed to help some but did not resolve the issue either.
Yesterday, I went out and checked the pressure pods on the distributor as the suggestion of a member of the Yahoo BiturboZentrum group. The diaphragms did not leak and they did actuate.
On the way home, I was surprised that the stumble is gone. I think the advance mechanism was jammed.
I also believe I have identified the reason for low boost, the AMAL valve leaks internally.
Saturday, February 19, 2011
vac system
Vacuum system is happy now. I removed all the emissions equipment - it was all non-functional anyways.
Now you can reach in from the passenger seat, crank and it fires immediately. She idles very nice now.
Some progress
It is raining this morning, though pretty light.
I cleaned the topside of the engine w/Purple Power.
While waiting for the plugwells to dry so I can change the plugs, I checked on the Horn. The terminal that supplies ground had slipped off. I tightened the crimp and the horn now works.
I also checked on the a/c. The system has -some- pressure and the compressor is not locked up. This makes me very happy.
Friday, February 18, 2011
parts are here!
I got the parts from MIE yesterday, sadly the clutch slave was defective. It wouldn't bleed. I shot off an email to MIE and they responded with excellent customer service. A new one is on the way.
I did manage to get the clutch working by removing the piston and seals from the one that the PO purchased (in October) and replacing it with the piston/seals from the one I purchased from MIE. So now I'll have a spare. Hopefully the seals didn't get damaged when I inserted them.
I then plugged up some vacuum leaks and the car started much better. But the lights/accessories didn't work. The PO told me they were intermittent. This is the first time they did not function. I jiggled the fuse box to no avail. I then poked around some wires coming through the firewall and the lights came on.
I went for a drive & the lights came on.
More tomorrow.
Wednesday, February 16, 2011
Parts is parts
On the way are:
- Clutch Slave Cylinder
- Plenum gaskets
- Weber 36 DCNVH rebuild kit
- Coolant tank cap
And I picked up 11ft of vacuum hose.
The plan is to remove the carb tonight, take it to Mikey who knows carbs. He'll rebuild it for me. Then I'll start removing the air pump, air injection manifold, and other emissions stuff that no longer functions. This will help simplicate the vacuum system.
Monday, February 14, 2011

Thursday, March 11, 2010
What does one do if their engine mount turns to dust; which in turn causes the accessory pulleys to touch frame rails?
We make our own mounts.
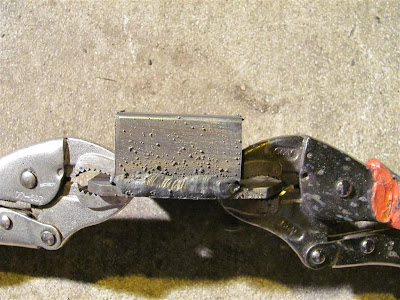
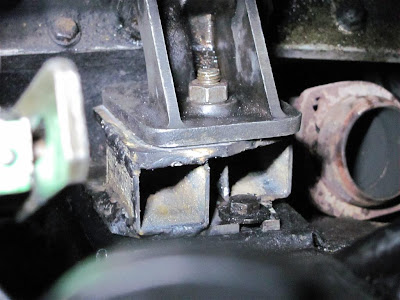
Unfortunately though, the largest square tubing HD had was about 1/4" smaller than I needed. I thought I'd be OK with the flex in the other two mounts (which are still rubber)
The other part of the mount is cast aluminium.
I don't like cast aluminium. It does things like this:
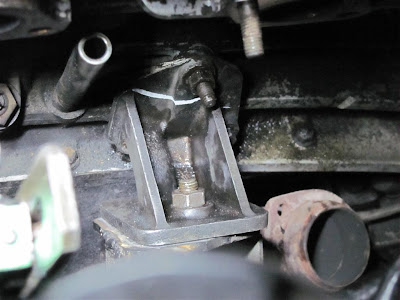
when stressed.
doh!
One day I'll have a better welder than my flux core.
We make our own mounts.
Unfortunately though, the largest square tubing HD had was about 1/4" smaller than I needed. I thought I'd be OK with the flex in the other two mounts (which are still rubber)
The other part of the mount is cast aluminium.
I don't like cast aluminium. It does things like this:
when stressed.
doh!
One day I'll have a better welder than my flux core.
Sunday, February 21, 2010
Fire!

Blower motor failed, causing blower motor resistor to get cherry red hot, causing leaf litter that makes it into the blower assembly to ignite.
Luckily, no damage done, need to find a blower motor now.
Friday, February 19, 2010
Some updates
This past Monday, I drove the Milano to work as I do every week day, with out issue. I left for lunch and the shifter was incredibly hard to move. I was very worried. I had drove the car up on a curb and crawled under while a coworker went through the gears. I could see no obvious binding in the isostatic linkage.
Later I removed the center console to look at the shifter bushing, only to find a riveted rubber boot. So after work I jacked up the car in the parking lot and removed the heat shield between the body and cat. I could see the rubber boot came off the bottom of the shifter, I liberally squirted WD-40 and the car shifts like butter. I was planning on properly greasing the bushing last night, but I ran into some problems.
Last night I wanted to replace the thermostat and grease the shifter bushing. I started with the thermostat and managed to shear on of the bolts. I decided to press forward, as I knew I needed to modify the thermostat housing for the thermostat I purchased. Proper thermostats for the Milano are $60, as the housing and thermostat are one unit.
The thermostat I purchased at Autozone is for some model of Ford, I am unsure of the actual application. Autozone sells it in their interchange, but it doesn't fit the housing as delivered.
.jpg)
The Milano thermostat housing and thermostat are one unit. The ears that hold the thermostat into the housing must be removed and machined flush with the housing. The ears are circled in red in the above photo. My precision machining consists of a cutoff wheel and die grinder. I love my air compressor.
I was unable to find the required M7x1.0x55mm bolt at Autozone last night. I went to home depot this morning and found a M7x1.0x50mm that will work temporarily until I can source a longer stronger bolt to replace the one that sheared and the other two as well.
The car heated up much quicker this morning, no leaks, and the car hovers just over 175F on the gauge. Hopefully tonight I can properly grease the shifter bushing.
This past weekend I cleaned the heck out of the oil separator between the valve cover and the intake. Oil was not separating and pooling on the air box cover. No more leaks from there now, much better.
I also I have a pigtail for the distributor hall sensor, so I can finally finish the Megasquirt harness.
A supposedly functional a/c compressor is also in my possession, purchased very cheaply from a 24 Hours of LeMons team. I'll bake the receiver dryer and see if I can't get cold air to come out of the vents soon.
Later I removed the center console to look at the shifter bushing, only to find a riveted rubber boot. So after work I jacked up the car in the parking lot and removed the heat shield between the body and cat. I could see the rubber boot came off the bottom of the shifter, I liberally squirted WD-40 and the car shifts like butter. I was planning on properly greasing the bushing last night, but I ran into some problems.
Last night I wanted to replace the thermostat and grease the shifter bushing. I started with the thermostat and managed to shear on of the bolts. I decided to press forward, as I knew I needed to modify the thermostat housing for the thermostat I purchased. Proper thermostats for the Milano are $60, as the housing and thermostat are one unit.
The thermostat I purchased at Autozone is for some model of Ford, I am unsure of the actual application. Autozone sells it in their interchange, but it doesn't fit the housing as delivered.
.jpg)
The Milano thermostat housing and thermostat are one unit. The ears that hold the thermostat into the housing must be removed and machined flush with the housing. The ears are circled in red in the above photo. My precision machining consists of a cutoff wheel and die grinder. I love my air compressor.
I was unable to find the required M7x1.0x55mm bolt at Autozone last night. I went to home depot this morning and found a M7x1.0x50mm that will work temporarily until I can source a longer stronger bolt to replace the one that sheared and the other two as well.
The car heated up much quicker this morning, no leaks, and the car hovers just over 175F on the gauge. Hopefully tonight I can properly grease the shifter bushing.
This past weekend I cleaned the heck out of the oil separator between the valve cover and the intake. Oil was not separating and pooling on the air box cover. No more leaks from there now, much better.
I also I have a pigtail for the distributor hall sensor, so I can finally finish the Megasquirt harness.
A supposedly functional a/c compressor is also in my possession, purchased very cheaply from a 24 Hours of LeMons team. I'll bake the receiver dryer and see if I can't get cold air to come out of the vents soon.
Saturday, January 23, 2010
Fan :)
I finally had an opportunity to install the Perma-Cool fan controller, which was excellent in timing as the next morning I was stuck in traffic for a long time.
I'm still waiting to get Megasquirt in. Hopefully within the next month, everyone in the house has been sick in some way or another for the last month.
I'm still waiting to get Megasquirt in. Hopefully within the next month, everyone in the house has been sick in some way or another for the last month.
Wednesday, January 6, 2010
Things starting to move forward
I have not done much of anything to the Alfa since changing the clutch, it has been an excellent car so far.
That said, I have been preparing for the Megasquirt2/Extra installation. At first I had decided to make a "plug-n-play" installation built around another Bosch 35 pin ECU. But upon further reflection, I've decided to remove the factory engine harness and build my own own replacement harness.
I pulled the engine harness from an early 90s Audi 90, so that gives me connectors for the injectors and coolant temp, I have a GM IAT pig tail that I will add to the modified Audi harness.
I found some 18 gauge/3 conductor shielded wire at Intertex which I will use for the distributor to MS and MS to coil wiring.
With any luck I'll have MS in and running within the next couple of weeks.. and then I get to start working on the Turbo setup.
That said, I have been preparing for the Megasquirt2/Extra installation. At first I had decided to make a "plug-n-play" installation built around another Bosch 35 pin ECU. But upon further reflection, I've decided to remove the factory engine harness and build my own own replacement harness.
I pulled the engine harness from an early 90s Audi 90, so that gives me connectors for the injectors and coolant temp, I have a GM IAT pig tail that I will add to the modified Audi harness.
I found some 18 gauge/3 conductor shielded wire at Intertex which I will use for the distributor to MS and MS to coil wiring.
With any luck I'll have MS in and running within the next couple of weeks.. and then I get to start working on the Turbo setup.
Tuesday, November 24, 2009
Week 1 w/new clutch
Wow the Milano is a blast. The 4.10 rear end makes it seem much quicker than it should be with it's meager power.
So far I am liking the Milano more than any car I have ever had, except the Megasquirt'd Fiat X1/9. However, when the added practicality is added in, it is a toss up.
I really am stuck on Italian cars now.
So far I am liking the Milano more than any car I have ever had, except the Megasquirt'd Fiat X1/9. However, when the added practicality is added in, it is a toss up.
I really am stuck on Italian cars now.
Subscribe to:
Posts (Atom)